by Phil Jordan
This article originally appeared on Too Much Coffee. This article and its photos are Copyright 2004 Too Much Coffee and are reproduced with permission.
This article covers the experiences of an early adopter of the Hottop roaster in its production form. What this article is, is a story about Life with a Hottop. What it is not is a detailed technical review of the machine or a detailed set of instructions about how to use the machine. Such can be found elsewhere (see the web bibliography at the end of this article).
Hottop Coffee Roaster
What is it?
What is it? Where have you been? The Hottop is only the most-talked-about home coffee roaster in the last couple of years – or at least it was until the I-Roast was announced recently. It’s certainly the most expensive coffee roaster available for the domestic market, and I know some smaller professional roasting outfits have considered it as an inexpensive sample roaster.
The Hottop is a drum coffee roaster, designed for home use, with a manufacturer’s recommended batch size of 250g of green beans per roast. This also makes it the highest-capacity (commercially manufactured) home roaster by a small margin, as the Alpenrost is specified to take a batch size of 225g. The Hottop is electrically powered, both for heating and drum rotation – no gas here, unlike in professional sample roasters. It is also computer-controlled – at the time of writing it is the only shipping home roaster with a built-in roasting profile (temperature over time). This is both good news and bad news. Mainly it’s good news as it means that the results produced are closer to those produced by professional drum roasters (note I said closer, not identical). It’s bad news if, after becoming proficient with the machine, you decide that in some cases you know better than the programming how a particular coffee ought to be roasted. All is not lost, however – more of this later.
That’s what it is. What it isn’t is a production roaster. You won’t build a business roasting with a Hottop. You may well be successful using it as a sample roaster, but it isn’t built for production use.
Why did I buy one?
Simple. I decided I wanted to do home roasting and tried using a popcorn popper. Once. I read a lot about other people’s experiences with the available alternatives. From what I heard the Alpenrost seemed to be a reliability nightmare, and the Hearthwares were getting the usual mixed reviews. I then decided that if I wanted to do this thing, I might as well have something that did the best job I could expect for home roasting. This was in January 2003, when the Hottop wasn’t quite shipping yet but was in its final production form. The pre-production reviews I saw from 2002 were very encouraging and a well-known pundit hadn’t yet started publicly panning the thing (for reasons which I subsequently found rather suspicious). A guy in Yorkshire claimed on his website that he was selling them, even back then. He wasn’t, however, and simply ignored all attempts to contact him. After a while, I gave up on him and I emailed Chang Yue (the manufacturers) directly. As luck would have it, they were coming to London to a trade show in a couple of weeks’ time, and they were bringing over a sample to show to punters at the show. They’d bring another one over just for me. What the hell – I figured if I didn’t like it, there was enough interest to shift it on eBay. Probably. Price – $700 US, in cash, preferably in US currency. Ah well.
On the 10th of February 2003, I pitched up at Olympia at the Asia Expo. This turned out to be a trade show, so in order to register, I had to pretend to be in an appropriate business. I was Anise Coffee. I walked over to the Chang Yue stand, introduced myself to the charming Shelly, and was given a long talk about the machine and the marketing challenges in N. America, a full demonstration, and lots of coffee, both roasted and green. I walked out an hour or so later with a sizeable cardboard carton containing my new baby, happy and ready to roast my own coffee forever more. Or not. We’d see. Carrying it across London back to my office in the City, and then subsequently home via the Tube and the usual High-Speed Train was entertaining.
Description of the machine – Pt 1
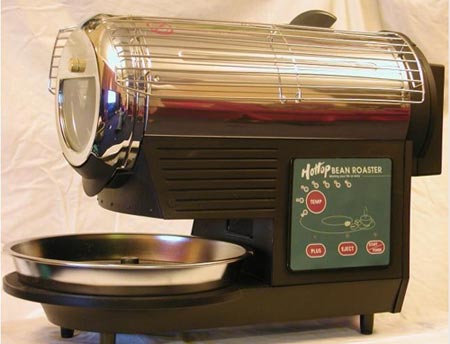
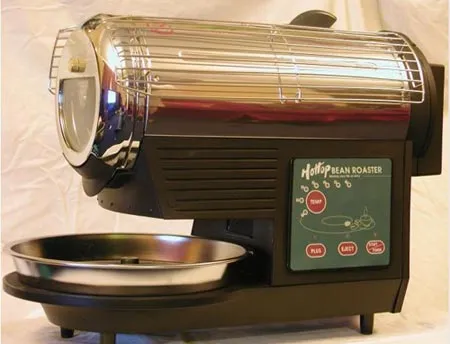
The Hottop is an electrically-powered tabletop drum coffee roaster, capable of roasting 250g per batch according to the manufacturer (although some users claim to have roasted batches of 300g or so most effectively – in fact there are reasons why this might sometimes be a good idea – see later).
Detailed view of Hottop Coffee Roaster
The first impression when you take the machine out of the box is that it’s a fairly large piece of kit. The overall footprint is 25.5 cm by 48 cm, and it stands 36 cm tall. The drum housing is the most striking part of the machine, being finished in chrome or something similar. The base and drum mounting are constructed of a solid plastic material. At the front of the machine is a removable, perforated metal cooling tray, with a motorised stirring arm. When the roasting stage is complete the coffee is dropped into the cooling tray, where the air is blown up through the coffee to cool it by a fan mounted on the base, while the coffee is simultaneously stirred by a rotating arm mounted on the cooling tray. This is a very similar configuration to that used in many professional drum roasters.
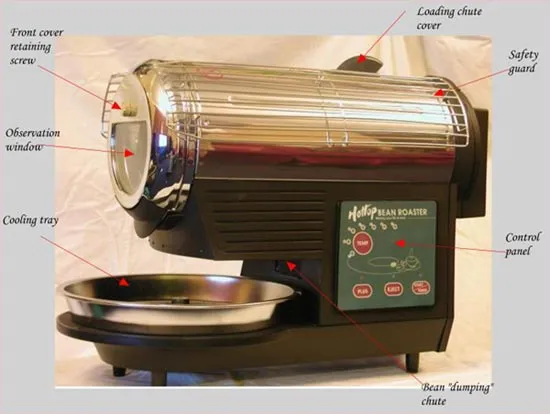
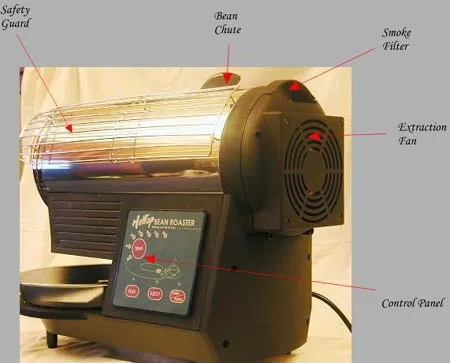
The drum housing is not insulated – during use it can get quite hot. This upset many of our North American cousins, many of whom seemed to feel that while they were far too intelligent to deliberately touch a surface that reaches a temperature of over 200° Celsius during operation, they couldn’t speak for the rest of the world. In fact, some people seemed to get upset about the roaster’s name, feeling that it was a reference to this perceived safety risk. Whatever. The machine ships with a pair of removable wire guards which clip to the outside of the drum housing and prevent you from doing anything silly in that area.
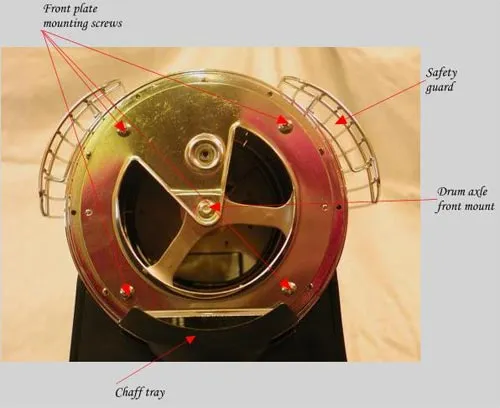
The front cover of the drum housing is removable: it is attached by a knurled screw. The cover also contains a clear glass window through which you can easily see the beans while they roast. After removing the front cover, the (removable) front mounting plate for the drum axle is exposed. Access to the interior of the drum is also possible – in fact easy. It’s a good idea to clean the drum out regularly as some chaff and broken beans can become trapped inside the drum and not fall into the chaff tray. Under the drum is a chaff collection tray, which slides out for cleaning (it is not necessary to remove the front cover for this). The front drum mounting plate is easily removed by removing the four Philips screws which retain it. The drum then slides out easily and can be cleaned thoroughly. Apparently, the drum is dishwasher-safe, but I stick to cleaning mine with a soft brush and a pointed knife to remove trapped bits of bean. The interior contains a corkscrew arrangement of thick wire attached to the inside surface of the drum and three impeller plates. Between them, these serve to tumble the beans within the drum as it rotates and to move them along the length of the drum to ensure even heating.
Removing the drum, the only features of note within the drum housing are the rear-drive mounting for the drum axle, the heating element (on the side of the drum opposite to the user control panel), and a small circular insert on the rear face of the drum enclosure. This is the temperature sensor, and some sources report that it should be cleaned occasionally to remove deposits of burned coffee oils. This may be so, but after over two hundred roasts I can detect no sign that mine requires cleaning.
One side of the roaster is dominated by the control panel. This is extremely simple to use, but I have to agree with those who say that it is too simple. There are four buttons, marked variously Start | Power, Eject, Plus and Setting. There is also an arc of seven red LEDs labeled from 1 to 7 to indicate the level of roast pre-selected.
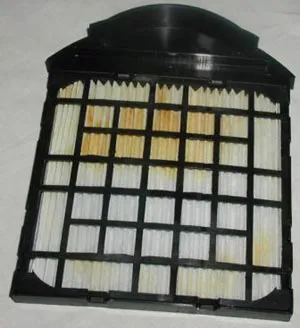
The rear of the roaster contains a fan assembly, used to draw heated air through the roasting chamber and to remove smoke. The air passes through a large removable filter assembly before being ejected from the rear of the roaster. Earlier versions of the roaster used an activated-charcoal impregnated foam filter material. This material is removable and according to the manufacturer should be replaced after approximately thirty roasts. Later versions use an additional layer of white microfibre material. This two-part filter is also supplied to all customers buying replacement filters.
Beans are introduced into the roaster via a chute on the top of the drum housing. This chute has a loose-fitting lid with a cool plastic handle and is left in place during roasting.
The Hottop’s roasting profile is a pre-programmed curve of temperature over time. The roaster’s control circuit utilises the roasting chamber temperature sensor and heating element in conjunction to attempt to achieve a pre-programmed temperature at a given time from the start of the roasting session. Various factors such as the moisture content and size of the beans and the ambient temperature affect how well this is achieved.
Description of the machine – Pt 2
The front cover of the drum housing is removable: it is attached by a knurled screw. The cover also contains a clear glass window through which you can easily see the beans while they roast. After removing the front cover, the (removable) front mounting plate for the drum axle is exposed. Access to the interior of the drum is also possible – in fact easy. It’s a good idea to clean the drum out regularly as some chaff and broken beans can become trapped inside the drum and not fall into the chaff tray. Under the drum is a chaff collection tray, which slides out for cleaning (it is not necessary to remove the front cover for this). The front drum mounting plate is easily removed by removing the four Philips screws which retain it. The drum then slides out easily and can be cleaned thoroughly. Apparently, the drum is dishwasher-safe, but I stick to cleaning mine with a soft brush and a pointed knife to remove trapped bits of bean. The interior contains a corkscrew arrangement of thick wire attached to the inside surface of the drum and three impeller plates. Between them, these serve to tumble the beans within the drum as it rotates and to move them along the length of the drum to ensure even heating.
Front View of Hottop Coffee Roaster
Removing the drum, the only features of note within the drum housing are the rear-drive mounting for the drum axle, the heating element (on the side of the drum opposite to the user control panel), and a small circular insert on the rear face of the drum enclosure. This is the temperature sensor, and some sources report that it should be cleaned occasionally to remove deposits of burned coffee oils. This may be so, but after over two hundred roasts I can detect no sign that mine requires cleaning.
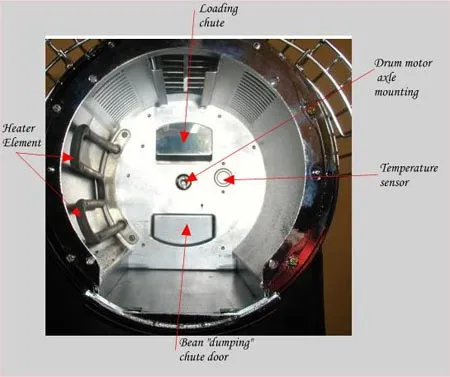
Interior View of Hottop Coffee Roaster
Description of the machine – Pt 3
One side of the roaster is dominated by the control panel. This is extremely simple to use, but I have to agree with those who say that it is too simple. There are four buttons, marked variously Start | Power, Eject, Plus and Setting. There is also an arc of seven red LEDs labeled from 1 to 7 to indicate the level of roast pre-selected.
Rear View of Hottop Coffee Roaster
The rear of the roaster contains a fan assembly, used to draw heated air through the roasting chamber and to remove smoke. The air passes through a large removable filter assembly before being ejected from the rear of the roaster. Earlier versions of the roaster used an activated-charcoal impregnated foam filter material. This material is removable and according to the manufacturer should be replaced after approximately thirty roasts. Later versions use an additional layer of white microfibre material. This two-part filter is also supplied to all customers buying replacement filters.
Beans are introduced into the roaster via a chute on the top of the drum housing. This chute has a loose-fitting lid with a cool plastic handle and is left in place during roasting.
The Hottop’s roasting profile is a pre-programmed curve of temperature over time. The roaster’s control circuit utilises the roasting chamber temperature sensor and heating element in conjunction to attempt to achieve a pre-programmed temperature at a given time from the start of the roasting session. Various factors such as the moisture content and size of the beans and the ambient temperature affect how well this is achieved.
Roasting with the Hottop
A roasting session is initiated by pressing Start. The LED for Setting “1” starts to flash. Repeatedly pressing the Setting button selects the roasting level desired, from 1-7 (if you go too far you simply end up starting at 1 again). Pressing Start for a second time then initiates the roasting process. The drum starts to rotate and the machine begins to pre-heat. You don’t add any beans at this stage!
After about four or five minutes the roaster is heated to its pre-determined start temperature. The control circuitry announces this to the user via a clearly audible beeping noise that continues for around a minute. Don’t worry, you won’t miss it. Pour your measured quantity of beans through the loading chute, replace the lid and wait. That’s it.
Well, not quite. The roaster will happily terminate your roasting session for you as soon as it determines that the pre-programmed end-point that you selected has been reached. However, you soon realise that to get the best results, you are the best judge of when to terminate the roast. For this reason, most users simply set the roaster on setting 7 and then wait for the roasting signs (cracks, smell, less often colour) that indicate that the roast is ready and at the stage that they were seeking. At this point, they press the Eject button and the roast is terminated.
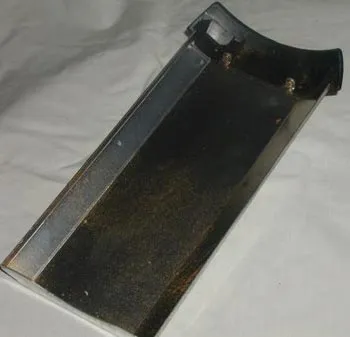
When the roast comes to an end, either automatically or when the user manually intervenes, a small solenoid-operated trap door at the rear of the drum is opened and the beans are dumped into the cooling tray. At the same time, a stirring arm in the perforated cooling tray starts turning, stirring the roasted bean mass. A fan is mounted under the cooling tray and this blows cool air up through the beans as they are stirred. The arrangement is most effective, and the beans are cooled to room temperature after about four minutes. The roaster then beeps at you again as it did at the beginning, signaling the end of the roasting session, and everything stops.
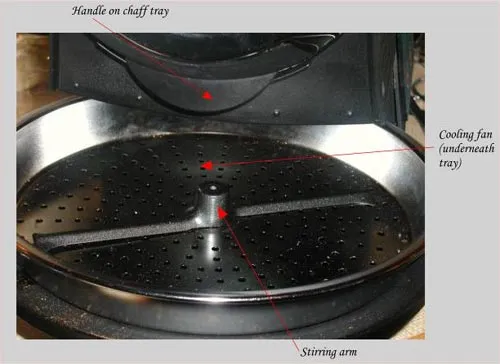
Hottop Cooling Tray
That’s it! Job done!
Initial Experiences
Remember, I had no real previous experience roasting my own coffee. I’d had a quick play with a popcorn maker and decided that that seemed hard work to do it right – I’d nearly cremated a batch of Lintong in around four minutes! So I was well positioned to understand how a complete beginner would fare roasting with a Hottop. I was a complete beginner!
The answer is: like a duck to water! The Hottop is an ideal machine to learn roasting on. It’s so easy to hear, see and smell what is going on. I immediately learned what first crack and second crack sounded like, and was able to start judging exactly how I liked my coffee roasted. As soon as I got a good supply of beans in stock, I was happily trying my hand at blending as well.
I was very happy.
I started logging all of my experiences when roasting too, in pursuit of a better understanding of my roasting results and also particularly in pursuit of repeatability. I bought a cheap stopwatch for timing. One thing I soon found was that I couldn’t always exactly repeat a previous roast. Some days, I could get to the same end-point with a particular bean within seconds of that achieved on a previous roast. On other days, I could be as much as a minute and a half off.
Why?
Voltage sensitivity
I soon understood a basic fact of life with electric coffee roasters: they are pretty sensitive to line voltage conditions. When I roasted at times when large domestic appliances in my house (such as the washing machine, oven, tumble drier, dishwasher – you name it!) were working, I would find that my roasting times were extended by a minute or two. I tried measuring the line voltage being supplied to the roaster and soon came up with the following information :
- The nominal supply voltage for my location is 240V +- 1V – it’s pretty stable
- Switch on a current-hungry appliance such as one of those mentioned above and the voltage drops by 2-3V
- Switch on a couple or more appliances (washer and tumble drier, maybe the dishwasher too – ah, domestic bliss!) and the voltage could be off by up to 5 – 6 V.
- This sort of voltage variation made a big difference to the roasting duration. This difference was discernible in the taste of the roasted coffee.
- Finally, to add insult to injury my Hottop is rated for the European standard voltage of 230V. Clearly, my house is not being supplied with a standard European voltage!
I researched this issue of voltage on the Internet. I was able to find out that the European convergence of supply voltages was intended to cause all countries to be supplied with a pan-European standard voltage of 230V, and that that convergence should occur in 2003. I am writing this article in late 2003 / early 2004 and it doesn’t seem to have happened yet – at least not where I live anyway.
These findings were a concern. On the one hand, I was finding that my Hottop (in fact, all electrically powered roasters I believe) was really quite fussy about the line voltage and those seemingly small variations could cause quite a big difference in the end results. On the other hand, my roaster was (quite sensibly you would think) rated for the European standard voltage of 230V, 10V adrift from the actual voltage I was feeding it. Clearly, I was not obtaining the roasting results that the designer intended when he programmed the roasting profile.
What to do?
Resolving the voltage sensitivity issue
I went out and bought a second-hand variac. This is a Claude Lyons Regavolt, a very substantial piece of laboratory equipment indeed, rated at 10A. New items of this type that I looked at on the Internet cost between GBP300 and GBP400 (say very roughly between 400 and 550 EURO). I got mine for GBP40 from Telford Instruments, plus another GBP20 for next-day shipping. I then went and spoiled everything by buying a Fluke 77 meter to monitor it with (around GBP150 I recall).
Using the variac I have been able to play with the supply voltage to my heart’s content. After lots of playing, I have come to the following conclusions:
- Most coffees roast very well indeed using the Hottop’s built-in temperature/time profile provided I supply the machine with its intended 230V. Coffees roasted at 240V still taste good, but dropping the voltage to 230V using the variac undoubtedly improves matters.
- A very small number of coffees benefit from a slightly slower, more extended roast (something to do with allowing the chemical (Maillard?) reactions that generate the flavour compounds time to progress before being stopped by more elevated temperatures, I think). If you have a coffee like this (Sweet Maria’s Kenya Mika and Hasbean’s Colombian La Manuela are both coffees that I have encountered that fall into this category) then drop the voltage by 15-20V as soon as the roast hits the first crack (but not before) seems to do the job quite nicely. The Hottop shows no sign of concern at being fed this lower voltage, although the roasting fan runs perceptibly more slowly.
Good news on voltage sensitivity
As a result of my experiences being shared with the new UK (and possibly European) distributor of the Hottop, I am very pleased to be able to relate that all machines sold in the U.K. from now on will be rated at 240V. Machines sold in Europe will be rated at 230V.
So you’ve no need to worry about all of this if you’re planning to go out and buy a new Hottop. I’ve related it all for the sake of interest, and also to demonstrate that you do need to be a little careful what else is going on in your home when you choose to do some roasting.
Also, the manufacturer claims that the current control chip logic is much less sensitive to voltage variations than the original one I was supplied with. However, I still think it’s best to play safe.
Other notes on repeatable roasting and living with the machine
One other factor that affects the roast profile is how hot the machine is when you start the roast. Second and subsequent roasts are always slower than the first roast. I have heard it said that this is something to do with the machine incorrectly performing the pre-heating cycle on roasts where the machine is already hot. I cannot comment on this (although I really ought to do some temperature measurements to test that theory). However, it remains a fact that subsequent roasts seem to be performed to a different profile to those performed in a cold roaster.
That said, a professional roaster friend of mine tells me that a cold roaster always roasts differently to a pre-heated one, although I suspect that the effect he experiences on his big professional machine is the other way around to the one I just described.
Domestic issues
The principal domestic issue in my household is that my wife and daughter complain vociferously if I don’t have a fresh supply of wonderful, fresh-roasted coffee!
That said, there is one minor domestic issue. Let’s face it: coffee roasting generates smoke. The darker you roast, the more smoke you get. You can’t get away from it!
The Hottop roasts a large batch of coffee for a domestic roaster. The smoke filter does a wonderful job of reducing the offensiveness of the smoke. However, you are going to get smoke. If you can’t handle that then home coffee roasting is not for you. Personally, I roast in the kitchen and just make the family put up with the odd bit of smoke now and then. However, if I was worried about this I’m told an extractor fan does an excellent job of clearing what smoke there is. Alternatively, roast in the garage or the shed. It’s up to you.
Hottop Coffee Roaster Filter
Where next?
I’ve had my Hottop for around 15 months now and I simply couldn’t imagine being without it. I’ve roasted all sorts of absolutely top-notch coffees and I’m generally speaking thrilled with the results.
In search of repeatability, I have purchased a thermocouple and meter so that I can measure the temperature in the roasting chamber and terminate the roast based on the measured temperature. It’s good fun to play with this sort of thing, and it probably improves my roasting results in certain cases to a slight degree. It also enables me to play games by altering the profile the designer programmed into the machine.
Another way of altering the profile is to use a slightly larger charge of green beans. The Hottop is allegedly quite capable of taking (at least) 300g of green beans. The only issue is that this slightly extends the roast. However, in some cases, this can be helpful, as mentioned above regarding the Kenya Mika and the Colombian La Manuela. So you don’t need to buy a variac!
The other issue you should take note of is cleanliness. Coffee roasting (especially when roasting dry-processed coffees) has chaff as a by-product. This accumulates in the drum. Most of it falls into the chaff tray and can then be removed. However, some of it collects in the drum housing. It’s fairly easy to blow this out using an air duster (obtainable at most computer or photographic shops). Also, eventually, you’ll find some pieces of bean eventually get trapped in the drum. If you don’t get rid of this stuff it will char and burn. At best this can taint the roast. At worst it could cause a fire.
Hottop Chaff Tray
Look after your roaster and it will continue to give you excellent coffee.
I intend to report on many of my other findings and experiences resulting from playing with Hottop. However, for the moment I’m just too busy roasting coffee!
Conclusion
After 15 months of living with a Hottop, I can only say that it’s an absolutely top-notch machine. Anyone who wants to roast their own coffee and doesn’t want to fuss about building a barbecue roaster (not all that practical here in Northern Europe anyway!) or some sort of mucked-about computer-controlled popcorn maker (sorry Mnemonix!) could do no better than simply to go out and buy one of these.
I have had only two issues with mine during its life. Firstly, I learned about voltage sensitivity the hard way. This should not worry new purchasers as all machines imported to the UK & Europe will be correctly manufactured for local voltage conditions. Secondly, after about 10 months the stirrer motor on my cooling tray failed. Hottop replaced it immediately, without question, sending me a replacement direct from Taiwan by FedEx so that I was up and running again in about 3 days. How good is that?
If you can spare the cash, go out and buy one. I’ve never bought roasted coffee at all since getting mine, and frankly, I can’t imagine doing so again (even if it was from a really good roaster like Hasbean, Hill and Valley, or James Gourmet Coffee).
Outstanding!
Resources
Hottop KN-8828P Coffee Bean Roaster First Look – 2008 article on the Hottop KN-8828P.